By Apple MandyFeatures correspondent

 Nico Schinco
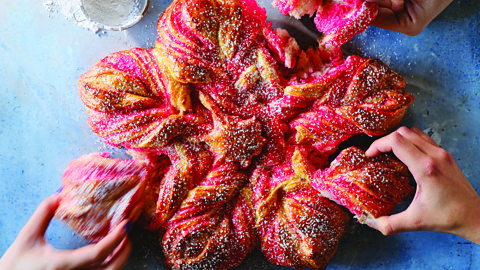
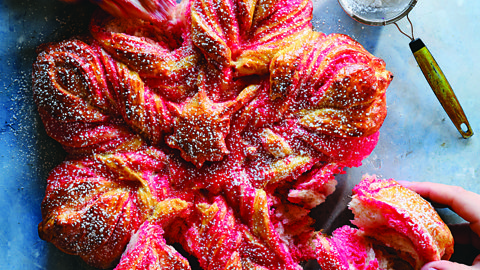
Pan de regla is a Filipino bread distinguished by its colourful filling. At the holidays, author Abi Balingit shapes it into a star that's reminiscent of Christmas lanterns.
If you've stumbled upon a panaderia (neighborhood bakery) in the Philippines, chances are you have seen freshly baked pan de regla, the soft Filipino bread roll filled with a custard-like pudding that ranges in colour from bright pink to dark red. The so-called "pink bread" appears different from its cousins pandesal (Filipino bread roll) and pan de coco (coconut bread), with its vibrant-coloured filling. No other favourites from the panaderia look like this, which screams for attention and piques your interest.
Pan de regla literally translates to "menstrual bread" for its distinct filling, but there are 14 different names given to it in different parts of the country. Depending on who you talk to and where they are from, pan de regla may have a Filipino name, such as ligaya (happiness) and lahi (race of a people), while in some regions, the bread has an English name, such as "everlasting" and "lipstick".
<p><a href="#Christmas star bread with pan de regla filling recipe">[jump to recipe]</a></p>
Despite the quirky names given to pan de regla, another popular name is kalihim. According to Amy A Uy, author of the book Panaderia: Philippine Bread, Biscuit and Bakery Traditions, this probably comes from the Filipino word lihim, which means secret. It is named such because it's the bakers'"secret" to make the pink filling using stale or leftover breads from the previous day, which are torn and mixed with butter, eggs, sugar and a hint of vanilla. When the filling reaches a paste-like consistency, dashes of bright red food colouring are added to enhance its colour. That filling is then baked into the bread roll.
Most pan de regla you'll see today is made traditionally, but some bakers steer away from that. Filipino-American Abi Balingit, author of the cookbook Mayumu: Filipino-American Desserts Remixed, published earlier this year, gives pan de regla a twist and recreates it in the form of a star-shaped bread with the characteristic red custard filling. "I was fascinated with this [kind of] bread sold at bakeries, but it's the colour [of the filling] that really struck me," Balingit said. "It's funny when I think about where the name comes from; there's so much multi-meaning coming from pan de regla that I admire. I also love the taste of it, so I wanted to incorporate the flavours minus the shape."

 Nico Schinco
Balingit's enticing star-shaped take on pan de regla is inspired by Filipino lanterns called parols. In the months leading to Christmas, these lanterns light up the streets, showcasing their intricate designs, geometric patterns and colourful lights. For Filipinos, parols are a reminder of family and a symbol of hope in troubling times. "One of my happiest memories growing up in San Jose [California] was seeing my parents put up parols every Christmas," said Balingit, who started baking at age 13. "I love parols and it's what has inspired me to create the shape."
The star-shaped bread is a fun way for families or friends to get involved and pull the bread apart as they eat it, as it has three layers of custard woven throughout. Pan de regla is also sometimes filled with purple ube (yam) or pineapple, but Balingit sticks to the usual ingredients. "It's one of the recipes that didn't require me to go out of the way to source ingredients because everything can be found at a standard grocery store," she added.
In the final stage, the pre-baked stars are coated with egg yolks and milk to add some richness and fat while baking, then brushed with melted butter for a glossy sheen and dusted with powdered sugar for a festive look. Though it may not be a regular pan de regla sold at a panaderia, Balingit says Filipinos will still find the flavours nostalgic and the textures soft and pillowy. Who knows, you might just start making this bread all year round.

 Nico Schinco
Christmas star bread with pan de regla filling recipe
by Abi Balingit
Makes 16 servings
Ingredients
For the custard filling:
2 cups small torn pieces white bread or pandesal
1 cup whole milk, at room temperature
1 large egg, at room temperature
⅓ cup granulated sugar
¼ tsp kosher salt
8 to 10 drops red gel food colouring
2 tbsp unsalted butter, at room temperature
1 tsp vanilla extract
For the bread dough:
1 cup whole milk
2¼ tsp active dry yeast
¼ cup granulated sugar
4 tbsp (½ stick) unsalted butter, at room temperature, cut into tbsp-size pieces
1 large egg, at room temperature
1 tsp kosher salt
390g (3¼ cups) all-purpose flour
nonstick spray
For assembly:
2 large egg yolks, at room temperature
1 tbsp whole milk, at room temperature
2 tbsp unsalted butter, melted
1 tbsp icing sugar
Method
Step 1
To make the custard filling, place the white bread pieces in a medium bowl. In a large measuring cup, whisk together the milk, egg, granulated sugar, salt and red food colouring. Pour the mixture over the bread and stir lightly with a whisk. Let sit at room temperature for 8 to 10 minutes for the bread to absorb the milk mixture.
Step 2
Pour the contents of the bowl into a medium saucepan. Cook over medium-low heat, stirring frequently with a wooden spoon, until it forms a thick paste, 5 to 7 minutes. Most of the liquid should be cooked out of the mixture. Immediately stir in the butter and vanilla and mix until smooth. Set aside to cool completely. You can save the custard in an airtight container for up to 4 days in the fridge.
Step 3
To make the bread dough, in a small microwave-safe measuring cup, heat the milk in the microwave for 30-second intervals until it reaches 42C to 43C (108F to 110F). Stir in the yeast and 2 tsp of the granulated sugar. Let sit for 10 minutes for the yeast to bubble up. It will look foamy once activated.
Step 4
Add the yeast mixture to a large bowl. Using a wooden spoon, mix in the remaining sugar, the butter, egg and salt until well combined. Stir 360g (3 cups) of the flour into the mixture until it forms a shaggy dough.
Step 5
Lightly flour your work surface with the remaining 30g (¼ cup) flour. Turn the contents of the bowl over onto your lightly floured surface. Knead until it becomes a smooth and elastic dough ball, 15 to 18 minutes. When you poke the dough with your finger, it should spring back. It will be really sticky at first, but keep on kneading until you get there!
Step 6
Grease another large bowl with nonstick spray. Place the kneaded dough ball in it and cover with clingfilm. Let it proof at room temperature until it doubles in size, about 1 hour. Line a baking sheet with a silicone mat and set aside.
Step 7
Set the clingfilm aside and punch the dough down. Divide into four equal portions and roll them into balls. Grab one of the dough balls. Cover the remaining balls with the clingfilm while you roll one at a time. Using a rolling pin, roll out the dough ball into a 25cm diameter (10in circle). Wrap the dough circle around the rolling pin. Carry it over to the centre of the lined baking sheet. Slather ⅓ cup of the filling over the circle in an even layer on top of the dough.
Step 8
Repeat the process with the rest of the dough portions, stacking each layer of dough and alternating it with the filling, until there is a final layer of rolled-out dough on top. You can stretch the edges of each circle if they aren't perfectly lining up, and you can trim uneven edges with a pizza slicer for a rounder shape.
Step 9
Lightly indent the centre of the dough with a 6.35cm (2½-inch) round cookie cutter. Starting from the outer edge of the dough and stopping when you reach the scored circle at the centre, make 16 equal cuts, like the petals of a flower, using a pizza slicer. Grab two adjacent pieces. Twist and rotate the two pieces outward twice, then pinch the edges together with your fingers to form the points of the star. Repeat this process with the rest of the pieces.
Step 10
Cover the shaped star with clingfilm and let it rise for 25 to 30 minutes, or until it puffs up. While the dough is rising, position a rack in the middle of the oven and preheat the oven to 175C (350F).
Step 11
Once the dough has risen, remove the clingfilm. Reseal the edges if the points of the star have opened up. In a small bowl, whisk the egg yolks and milk together until smooth. Using a pastry brush, coat the surface of the bread with the egg wash. Bake for 18 to 22 minutes, or until golden brown.
Step 12
Transfer the baking sheet to a wire cooling rack. Using a pastry brush, brush the star bread with the melted butter and let it cool for 7 to 10 minutes. Using a small sieve, top the bread with a light dusting of the icing sugar before serving warm. Store any leftovers in an airtight container at room temperature for up to 3 days.
(Reprinted from Mayumu by Abi Balingit. Copyright © 2023 by Abigail Balingit. Reprinted by permission of Harvest, an imprint of HarperCollins Publishers.)
BBC.com's World's Table "smashes the kitchen ceiling" by changing the way the world thinks about food, through the past, present and future.
---
Join more than three million BBC Travel fans by liking us on Facebook, or follow us on Twitter and Instagram.
If you liked this story, sign up for The Essential List newsletter – a handpicked selection of features, videos and can't-miss news delivered to your inbox every Friday.
"bread" - Google News
December 09, 2023
https://ift.tt/76Kyt5a
A festive Filipino bread for the holidays - BBC.com
"bread" - Google News
https://ift.tt/OV0jY1D
https://ift.tt/R0eiAnB
Bagikan Berita Ini


0 Response to "A festive Filipino bread for the holidays - BBC.com"
Post a Comment